Connect with a verified veterinarian in minutes. Licensed vets are available 24/7 to answer your questions. No need to worry about your furry family member.
Do you have a working dog? Does he enjoy trying new things? Would you like to try something new and possibly have a helper around the house? Then you’ve come to the right place!
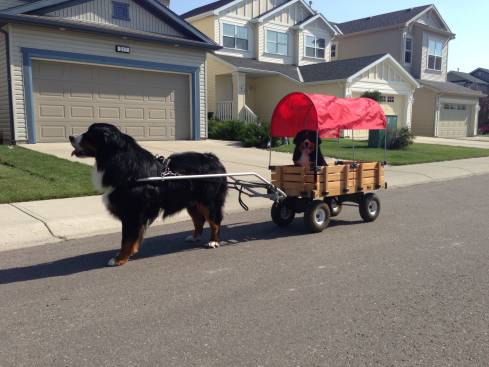
In this article, we’ll cover how to teach your dog to pull a cart, the type of harness that’s best, as well as looking at DIY dog carts! Sound like fun? Then let’s get started!
Why Teach Your Dog to Pull a Cart?
Not only can it be fun to teach your dog to pull a cart, but it’s also something that’s quite practical. If you a working dog, then they’ll also appreciate having something to do that’s fun and different. Plus, look at it from their point of view. If you train them to pull the cart, that means rewards (i.e., treats) will be involved. What dog wouldn’t be tempted?
View this post on Instagram
Dogs who come from working breeds really do appreciate having a job to do. After all, this is what the dogs were bred to do from the beginning—work. In fact, a working dog that doesn’t have a job can suffer both physically and mentally. They can become depressed, lethargic, or even in some cases may act out because they’re simply bored. Giving your dog a purpose and a job will keep this from happening, and he’ll thank you for it!
Dogs that do well with pulling a cart include Newfoundlands, Bernese Mountain Dogs, Huskies and more. These types of dogs have used for pulling carts, or even sleds for hundreds of years. And don’t think it’s only large dogs that benefit from having a job.
Medium dogs that weigh at least 30 lbs, are also able to pull carts. And many medium dog breeds were also raised to work. You just have to get the right sized cart if you have a smaller dog. Your fur baby will also get some great exercise!
If your dog is active and healthy, two years or older, then he may really enjoy learning how to pull a cart!
Teaching your dog to pull a cart also comes with some benefits for you, not just for your dog. You can train your fur baby to help you with many types of jobs. He can be trained to help you lug firewood, haul groceries, and more.
So, not only will your fur baby enjoy the work, but you’ll also have a partner to help you with some of the chores around your home! You both benefit and have fun in the process!
Pulling a Cart Has a Name: Carting
View this post on Instagram
The office term for teaching your dog to pull a cart is called “carting” or “drafting.” These are the terms used for a dog pulling a cart or wagon. In fact, this is also a sport, especially for larger dogs.
Now, let’s move on to the tools you’ll need: dog carts and harnesses!
Review symptoms, medications & behavior to keep your pets healthy with a Vet Online in just minutes.
Ask a Vet Live NowTools of the Trade: A Harness
Before you can start training your canine companion to pull a cart or wagon, you’ll first need a proper pulling harness and a cart or wagon.
You’ll need to find the right type of harness for your dog and it needs to be fitted correctly. The harness used for this purpose is called a carting harness. This is the most common type of harness worn by dogs who do this type of work.
A carting harness can be made of leather or nylon, and it must include backup d-rings, which help to control the cart. The harness may also come with the traces, which are the leads that attach the harness to the cart or wagon. Because these harnesses come in a wide range of sizes, you’ll need to make sure to buy a harness that fits your fur baby properly. Otherwise, an ill fitting harness can make a dog uncomfortable and keep him from working well pulling the load.
Another type of harness used for pulling dog carts is called the Siwash harness. This type of harness has been said to be more form-fitting and includes a series of nylon webbing to make a better fit on the dog. This harness is usually a bit challenging for newbies (the pet parents) who are stuck with trying to see how the harness is even supposed to go on. However, this is a better harness for dogs pulling a load, as it distributes the weight of the load more evenly across the dog’s chest and shoulders. The dog has better control of the load.
There is another variation of this harness called the freighting style Siwash, which is a little bit different. This harness is most often used to control loads on sleds. The freighting style Siwash can also be used with a sled that’s on wheels. While the difference is hard to tell at first, you will notice that the traces are at a slightly different angle. This type of harness also usually includes a wooden spreading bar.
View this post on Instagram
You also have another option, and that is to DIY dog cart pulling harness! Here’s what you’ll need to make a pulling harness for your dog:
- 4 ft nylon webbing
- Sharp, strong scissors
- Heavy needle
- Heavy thread
- Fleece (real fleece, which is thick—not blanket fleece, or fleeced used to make shirts)
Here are the steps you can follow to sew a harness for your dog:
1). Fold the nylon webbing in half and make a loop (you’ll put the rope through this later). Leave enough room for the loop of rope to fit through—no more space than that. The rope is what will connect your dog’s harness to the sled or cart.
2). Next, sew the loop closed with the heavy thread and needle. It’s best to use a stretch stitch. By hand, you can do this by making one stitch forward, and two back. Otherwise, you can do this on a heavy duty sewing machine.
3). Next, set the loop at the base of the dog’s tail. You may need an extra set of hands for this part.
4). Lay the webbing diagonally on each side of your dog’s body, starting at the tail, running under the dog’s front legs and through his “arm pits.” Cross the webbing diagonally a few inches below his neck, and at the top of his rib cage. Then pin this crisscrossed webbing closed. You’ll need to make sure the webbing isn’t too tight, but it needs to be a snug fit because later you’ll be adding the fleece here.
5). Pull the webbing rom the crisscross at your dog’s neck, then around his neck and crisscross again and at the top of his shoulder blades. Pin this crossed webbing closed.
6). Now, measure the webbing that runs along your dog’s flanks, from the base of his tail to below his front leg. Mark the point that’s halfway with a pin. Repeat the same steps on the other side of your dog. This second pin should mark the bottom of your dog’s rib cage.
View this post on Instagram
7). Pull the webbing from the crisscross at your fur baby’s shoulder blades, then run each end of the webbing down the dog’s side to the mark you made in the last step. Do this on both sides of your dog. Cut away the excess with scissors and pin the webbing where it meets at the mark (the pin).
8). Next, add a small piece of webbing to connect the two pieces that run along your dog’s flank. This will keep the harness from slipping down over his tail end. Remove the harness from your dog. You can sew this connector piece straight across from one side to the other, in an “x” pattern. Begin at the loop and measure off about 2-3 inches. Connect this additional piece of webbing at this point using the needle, thread and stretch stitch.
9). Measure the harness from the crisscross at the base of your fur baby’s neck to his “arm pits.” Do this for both sides. This is the area that will need to be covered in fleece, which will provide some padding for your dog when he’s pulling the cart or sled.
10). Cut the fleece to the length of the measurement you took in the previous step. Cut the width of the fleece 10 inches so that you can fold it over 5 times to make thick padding for your dog.
11). Fold the fleece inward as if you were rolling it. The finished width should be 2 inches and you should have 5 layers of thickness.
12). Slide the fleece beneath the harness at the location you measured in step 9. This should be done before sewing the harness to so the harness will not be too tight on your canine companion once the fleece padding is added.
13). Sew each pinned crisscross using the strong needle and thread, with the stretch stitch.
14). With the needle and thread, sew the fleece onto the harness, along with the outer edges of the nylon webbing, and across the width of the webbing where the fleece padding ends.
That’s it, you’re done! Congratulations on making a harness for your dog! Now, let’s take a look at the next tool you’ll need.
Tools of the Trade 2: The Cart
When it comes to carts or wagons, you’ll find there are several types to choose from. You can buy a cart or wagon with 2 or 4 wheels, or you can even build a cart with diy dog cart plans!
We found some instructions on how to build a dog pulling cart created by Angie Meroshnekoff. Her plans make use of PVC and wheelchair wheels, though she does say you can also use 20” bicycle wheels for the dog cart. You can find her instructions and photos on her site.
Next, we found some instructions on how to build a dog sled with wheels. You can find the instructions, written by Darlena Cunha on this site. Her instructions make use of a child’s wagon, which makes this an easy project.
We hope this article has given you some ideas on you and your dog can being learning a fun new project together! Your dog will love the work, and you’ll have a work partner when your dog learns how to run his cart.
Dogs and Carting
View this post on Instagram
Mushing is a fun and relatively easy way to help your dog earn his keep. It’s an easy way to let him know you care about him and to give him something fun to do. If you have a dog who’s already working for you, this is also a great way to introduce them to new tasks and build on what they already know. You can also use this method as a bonding exercise with your dog or a training tool for obedience work.
Sled dogs were originally used to pull sleds, but now they’re used for all sorts of things. They’re used for hunting, and sometimes even for sport. There are even sled dog races! A dog who is pulled by a sled can develop a number of muscles that he wouldn’t otherwise get the chance to use, and it will help strengthen his whole body.
Weight pulling is a type of sled dog racing that can be done with any breed of dog. A weight pull is a sled race where the dogs pull a set weight up and down a set distance, usually about 2 miles. Weight pulling events are held all over the world.
The Swiss Mountain dogs are one of the most popular breeds for weight pulling. The long, lean build of the Swiss Mountain dog is perfect for pulling, and he’s very agile. He can also pull heavy weights!
The Doberman Pinscher is another breed that’s commonly used for weight pulling. They’re strong and muscular, which makes them great at it. They also have a naturally high level of intelligence, which makes them very easy to train and good at obedience work.
Pit bulls are also very common in weight pulling events. They’re not just good at pulling, but they can also perform other jobs such as racing and agility competitions. Some people even use them as police dogs!
It doesn’t matter what breed you choose to pull with, you should always make sure that your dog is healthy enough to do so before letting him do it. You can ask your vet or check with your local dog club for recommendations on what dogs are healthy enough to pull heavy weights. If you have any concerns about your dog’s health or ability to do this job, don’t let him try it!
Skijoring is a sport that involves pulling a dog or team of dogs behind a skier. Skijoring is a fun way to enjoy the outdoors with your dog and can be an excellent way to exercise him and give him some exercise.
While you don’t need any special equipment to skijor, you do need to have your dog trained in obedience and handling. He should be able to sit, lie down, come when called, walk on a leash, and stay away from traffic.
It’s important that you have your dog trained well before you get started so that he knows what he’s supposed to do at all times. Even if you aren’t planning on doing any competitions or competitions with other dogs, it still pays to make sure your dog is comfortable with everything that goes along with the sport of skijoring! You want him to be able to go anywhere with you whenever you want without any problems!
The dog wagon is a type of sled that you can pull with your dog. This is a very simple, lightweight design that allows you to use your dog for all sorts of different activities. You can use it for all sorts of things, from taking your dog on walks to pulling sleds.
Parades are also a great way to work your dog. While they’re hard on their joints, they’re great for teaching and training. They can be done with a cart, with a walker, or even by hand. A parade is an easy way to teach your dog commands and can help with your dog’s socialization skills as well.
Draft dogs are a great way to teach your dog new tricks. Many dogs can learn how to do draft works at the same time they’re learning how to work. If you want to train your dog to work with you, this is a great way to do it.
The choice is yours, but whichever one you choose, remember that these are jobs that your dog loves doing and will love even more when he gets paid for it!
We hope this article has given you some ideas on you and your dog can being learning a fun new project together! Your dog will love the work, and you’ll have a work partner when your dog learns how to run his cart.
Connect with a verified veterinarian in minutes. Licensed vets are available 24/7 to answer your questions. No need to worry about your furry family member.

Tom
Tom has always loved to write since he was little - he wanted to be either a writer or a veterinary doctor, but he ended up being a professional writer while most of his works are based on animals. He was born in San Francisco but later moved to Texas to continue his job as a writer. He graduated from the University of San Francisco where he studied biotechnology. He is happily married and a soon to be father!
Review symptoms, medications & behavior to keep your pets healthy with a Vet Online in just minutes.
Ask a Vet Live Now